Tuesday 26 July 2011
Thursday 21 July 2011
Working with SHP Files, MAP3D and SSA
I am currently working on a number of stormwater, sewer and watermain network projects with master plans for future development that will eventually discharge into council infrastructure downstream of the development sites. The master plans are pretty fluid changing quite often to meet market demands. So I thought I would take this opportunity to get into MAP3D and SSA to setup a downstream SSA model of existing infrastructure to plugin upstream development scenario's to see the effects on the existing infrastructure.
To date I have never really gotten into MAP and SSA about the most advanced thing I have done in MAP is get some contour shp files and extract the contours as polylines and attach elevations to them to built a surface in Civil3d. To do this I have used the process that Jason Hickey describes in this old post Civil4d.com and of course in trying to find this link I just found a load of old MAP tips posted by Dana.
Anyway to get started with my model I did a search of the councils website and located the name and number of the councils GIS Manager and gave him a call. This can sometimes be the hardest part of the process finding the right contact to be talking to in council to get the right data. Sometimes there maybe a charge to obtain the data but in my situation there was not as I would be auditing the data and updating any errors I found.
In due course the numerous shp files with all the data arrived by email. I should mention that for a pipe network there will in fact be numerous shp files as an individual shp file is written for each type of object so you will have at least one file for pipes and one for structures.
To start I watched Dana’s post here on importing GIS data into SSA and thought I was off and would magically have an SSA model in no time. Not so here are the traps I found on the way:-
Trap number 1
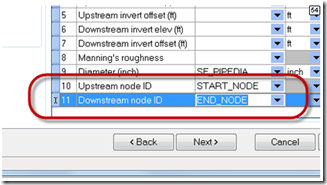
You won’t know what shp fields to map to the SSA fields on the import process.
To found out what shp data fields to matchup to SSA fields you are going to have to open the SHP files with MAP first and review the supplied data before you go into SSA.
What got me was what Dana pointed out in her post the mapping of Upstream and Downstream node ID’s. The SSA import progress takes a guess at what data fields these maybe in the pipe shp file but if that guess is wrong then no pipes at all will appear in your SSA model and you start scratching your head.
To find out what shp database fields I had to map to the Upstream and Downstream nodes I opened the pipe and manhole shp files in MAP
Aside
Before I go any further I should mention there are two ways to open a shp file import them into Autocad or connect to them. As mentioned earlier my knowledge of MAP is pretty limited so to get up to speed a bit I watched Rick Ellis 2009 AU paper on MAP here it gives a good overview of a number of basic tasks civil engineers may want do in MAP and covers the importing versus connecting scenario’s. Basically I have been importing data but now as a want to return the updated shp files to council, I am connecting to update the original data.
To deduce what field’s of the pipe shp objects represented the up and down stream nodes I
- Connected to the pipe and manhole shp data files in map
- Located a pipe of interest
- Selected the manhole nodes at the start and end of the pipe and pressed ctrl+1 to bring up the properties window. Noted down the manhole name
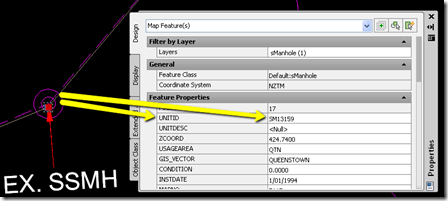
- Selected the pipe between the two manholes/nodes and pressed ctrl+1 to bring up the properties window and Noted down the the pipe field names with the corresponding manhole names.

- Selected the start and end nodes to get their names and then selected the pipe in between the nodes and looked for the manhole names in the property window to find the correct node fields.
I happened to know the flow direction of the pipe so new which was the start and end manhole/node.If you do not know the flow direction you can look for the invert field and from the higher invert deduce the upstream manhole. From here I went back to SSA and mapped the correct nodes to the start and end and the pipes came into SSA.
Trap Number 2 You have to also map the upstream and downstream invert levels of the pipes correctly
or on import in SSA your inverts will be missing or the same value
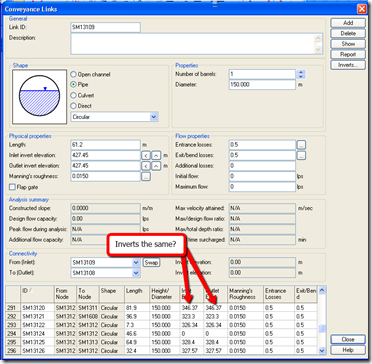 and also correctly map the invert and junction elevations for the manholes.

Trap Number 3 Not all the GIS data supplied will be correct, you will need to find the incorrect data clean it up and correct it in the shp file in MAP or SSA. I chose to do the clean up in MAP Step 1 First you should label your objects with object data so you can visually see what objects have the incorrect data. There are two different ways to label your objects depending on if you have imported or linked to the shp file data. If you have imported the data you use blocks with attributes – see pages 7 to 9 of Ricks AU hand-out (here) for the process or if you have linked to the data see the 1hr 2min mark in his presentation video or do the following.
- Type mapwspace at the commandline
- Goto the Display Manager,
- Double Click the shp file data you want to label or Select the object and Right Click select edit style.
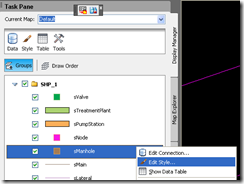
- Check out the shipped label tutorial. To label the manholes I selected Label Feature
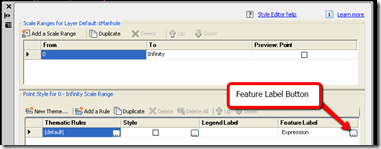
- Under Property to display choose “expression”
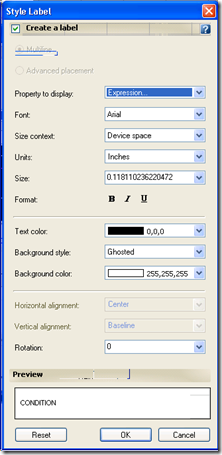
- Added the following expression with two fields of data for the manhole lid level and the invert
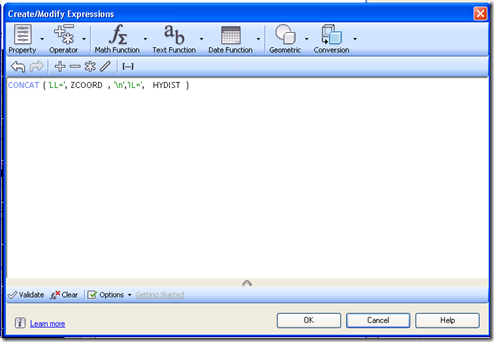
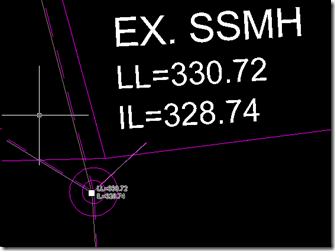
- Ended up with the smalller of the two labels in the following screeen capture to compare against the values in the larger from an historical as built xref
Note: You can label your pipes with data in a similar fashion.
Step 2 In my network some manholes had zero elevations or were in the wrong vertical datum. To find them and fix them I did the following
- To locate the manholes with the incorrect data you use filters or queries on the data or use the Data Table view. I chose to use the Data Table View option
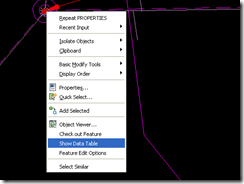
- To open table view select an object and right click, and choose “Show Data Table”.
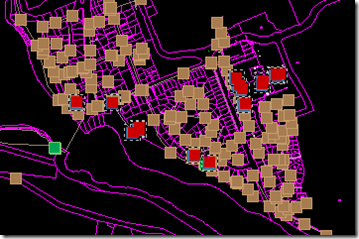
- First to check whether the objects with zero data were in my project area I shift+selected each row with 0 elevation in the Data Table and then right clicked and choose select. This highlighted each object with a grip so I knew where they were in space.
- Now to update the objects with zero elevation I looked at the zcoord column which was lid level and sorted the column into ascending order then I just clicked on each row on the left-hand side and the view jumped to the structure in question and I typed in the correct lid level according to the underlying as built xref.
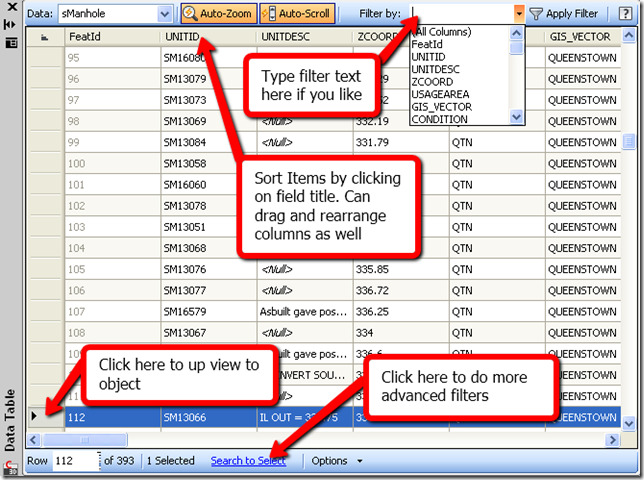
- Next I did the same for the invert levels and the structures with the incorrect elevation information which in my case were easy to find as they were exactly 100m out or 0.
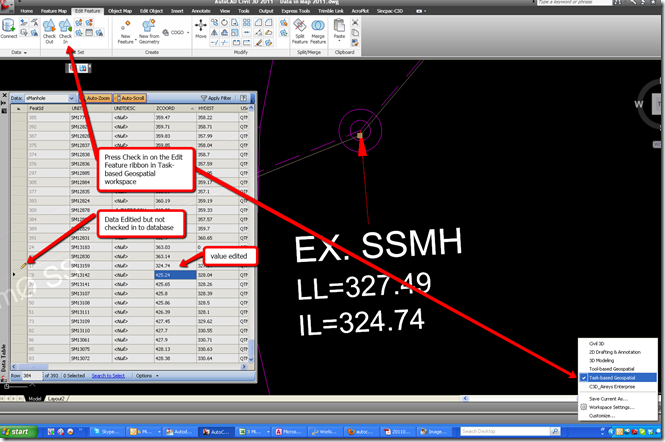
- To force the changes back to the shp files and database you have to check the information as shown above.
Trap Number 4 The crash. Civil3d/MAP kindly crashed while I a dozen or so objects checked out of the shp file so the the objects disappeared from the updated shp files. So always check in object as soon as you have edited them. To pull the objects back into the updated file from the original emailed shp file you have to connect to both the new and the old shp files. You can create the connect to the original data using a filter to just filter the data down to the objects you want.
then do a bulk copy from the tools button on the Map Explorer tab
and map the data to be copied from one shp file to the other
Trap Number 4
Don’t get confused with the manhole invert. When dealing with the situation where you have two pipes coming into a node with different incoming inverts and one out going pipe the invert of the manhole will or should be the lowest invert. There are upstream and downstream inverts in the pipe objects which store the individual pieces of pipe information,Label the pipes to see this information on screen

Trap Number 6 Some pipe or manhole objects maybe completely missing. You will have to add them to the shp files. Check out the tutorial Drawing objects Straight to shp file or quickly
With this method you have to type in alot of object data. I see you can create a class of object maybe you can have data filled automatically in the object class not sure still have to investigate.

Now we have good data to go into our SSA Model.
P.S. Here’s another blog on of interest on the importing of GIS data into Civil2012 that I found. https://totalcad.wordpress.com/2011/05/02/importing-gis-data-into-pipe-networks-with-civil-3d-2012/
Sunday 17 July 2011
Monday 11 July 2011
Surface Style Border Lineweight Ignored
Lineweight for the color to a fixed weight and not “Use object lineweight”. From the autocad help file
The DEFAULT value is set by the LWDEFAULT system variable, which has an initial value of 0.01 inches or 0.25 mm. All new layers use the default setting. The lineweight value of 0 plots at the thinnest lineweight available on the specified plotting device and is displayed at one pixel wide in model space.


